
Hackers often use malware to take control of your site. After that, you will likely see foreign texts, links to malicious sites, and blocked alerts when searching for the site in Google. Sometimes, they even take over the site access and block your entry.
Nothing can be scarier than losing your site’s access, right?
Don’t worry more. In this article, I will show you everything from detecting the malware injection to removing it. Moreover, you’ll learn some tips to protect your website from future attacks!

A reported 30,000 websites are under cyber attack globally every day, 400,000 each month! Take those stats and imagine how many websites are hacked each year. And this number keeps on growing from one year to the next. WordPress websites are at an even greater risk as they run on almost half the websites globally! So, it’s very crucial to remove malware from a WordPress site.
What is Malware?
Malware is a short form of Malicious Software. Such harmful software enters the WordPress database via hostile code, malicious plugins & themes, code snippets, siteurl, vulnerable WordPress core files, and harmful software on the server.
It uses viruses, Trojan horses, backdoors, worms, spyware, and spam injectors to penetrate a website’s security.
Once the hackers get into your WordPress site, they do every kind of damage to your website. That includes deleting files, modifying the admin interface, creating hidden admin, redirecting to malicious links, stealing important data, and so on.
Moreover, intruders can inject harmful code snippets to hide security plugins that detect and remove malware from website. If it happens, you need to remove malware manually in a hard way.
We’ll discuss and show you both ways to remove such dangerous entities from your WP site. Don’t skip any section ahead.
How to Scan Websites for Malware
The process of solving a problem starts with finding one. Likewise, you must know how and from where malware enters your system or website. Then after analyzing the type of virus, you can attempt to remove malware from WordPress site properly.
So let’s see how to check malware on a website:
- Use Malware Scanning Plugin: There are some effective WordPress plugins available to scan for malware on websites. Wordfence, SecuPress, Sucuri, GOTMLS, Jetpack, and WPscan are some of the best security plugins that scan and then remove malware effectively.
- Focus on the Common Signs for Malware: When your site gets infected with viruses, look for some common symptoms. That includes changes in login credentials, modification of website data and backend files, website crashes, harmful content warnings, rapid changes in search results, or significant drops in traffic. If you notice any such activity, take that for a malware attack.
- Use Google Safe Browsing: Use the Safe Browsing tool from Google to know if your site is safe.
- Check the WordPress Database: Try to enter the site database from phpMyAdmin and download the database file for your targeted website. Then scan the file with an antivirus tool/software.
- Report from Visitor: Your visitors are the first ones to notice something is off about your site. They may complain about site content that has changed and replaced with malicious links.
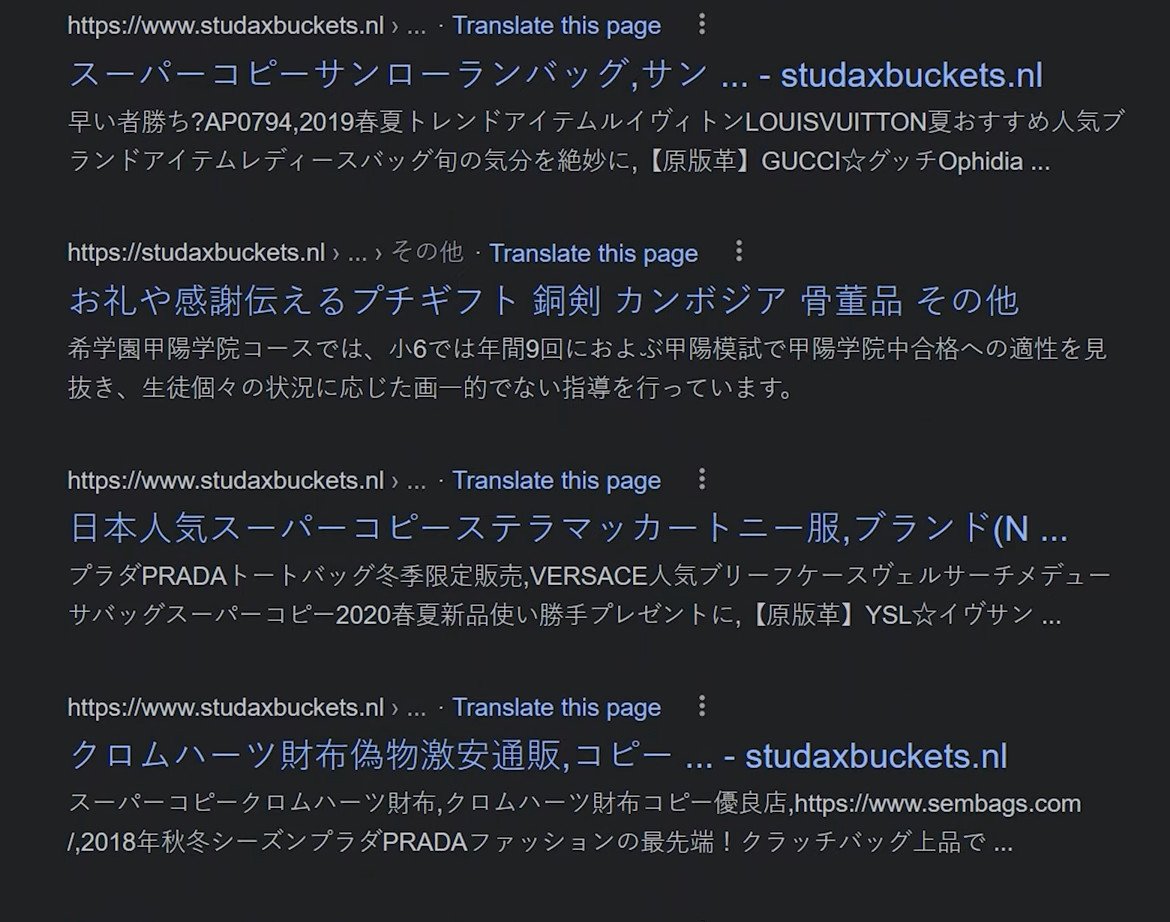
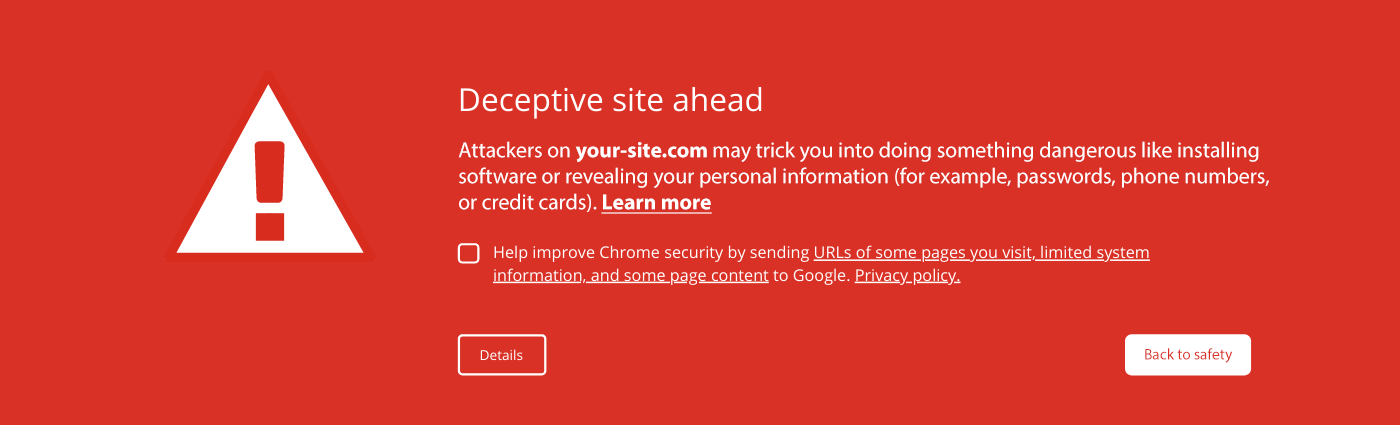
- Search the Site on Google: Hackers will replace your default home page with spammy links and phishing sites. Upon searching your site on Google, you may see the entire language changed to a different language, such as Japanese. You may also see spammy meta descriptions for the sites. And when you click on a link, Google will show you an alert that says the site contains malware. This will also prompt Google to remove your site from any future search results.
- Report from Hosting: The hosting provider will also contact you because your site will consume unusually high resources during these times. This is due to the malware that’s running all the scripts using your webpage. WordPress has become painfully slower than it was before. Google Analytics will also show unusual spikes. Compare the data from a few weeks, and you will see a lot of traffic. The Google Search Console also shows you alerts when it detects anomalies in its data.
Even one of the above symptoms is enough to point to a possible malware infection. Then, removal of the malicious code is the only way to take control of your site. Continue reading ahead to learn how to remove malware and keep your site secure.
How to Remove Malware From WordPress Site Automatically
To automatically remove malware from website, you need to install a security plugin and run a security check. WordPress malware plugins can identify malware and viruses present on your site and remove them.
And if the core WordPress files are affected, they can repair them, too.
We have covered the best security plugins for WordPress in a separate article. Check that out if you haven’t installed any security plugins yet.
So, if you can log in to the WordPress Dashboard, open the security plugin, and run a complete site scan. This will take minutes to run or even longer, depending on how thoroughly you want to scan the files. Select Clean, and it’ll remove the detected threats.
Most security plugins display a score showing you how secure your WordPress site is. Try increasing this score by following their recommended actions. This strengthens the site’s security.
When the security plugins remove malware altogether, run the scan again.
Also, check the security score. This should improve from what it was before. Then, go check your site from the browser. It should be back to normal.
However, this option only works when you can still log into the WordPress Dashboard.
Site owners often lose site’s access while it’s been hacked. The admin password no longer works. Then, you can no longer log in, or even worse, the login page disappears. Then, the only way is to clean the viruses yourself manually.
How to Remove Malware From WordPress Site Manually
If you cannot log in to the WordPress dashboard anymore, there are two ways to access your site and its files. The first is logging in to your hosting account, and the other is using FTP software like FileZilla.
Sometimes, the hacker changes the hosting passwords, too, so the FTP client becomes the only option to access the site’s files. If you can still access the hosting dashboard, the first step will be the same.
So, let’s see how we can access the site’s files manually and remove malware from WordPress site:
1. Download Your Site’s Backup
Before starting the process to remove malware from the site, download the site’s files to your computer. If your hosting provider has automated backups, check there and download the last backed-up files.
If you haven’t backed up your WordPress site, then we will need to work with the site’s files in their present state.
Then, we will download the site’s infected files to our computer. That may not look like a good idea at first, but it will come in handy when we analyze why the site got hacked. But make sure you have a good antivirus installed before doing this.
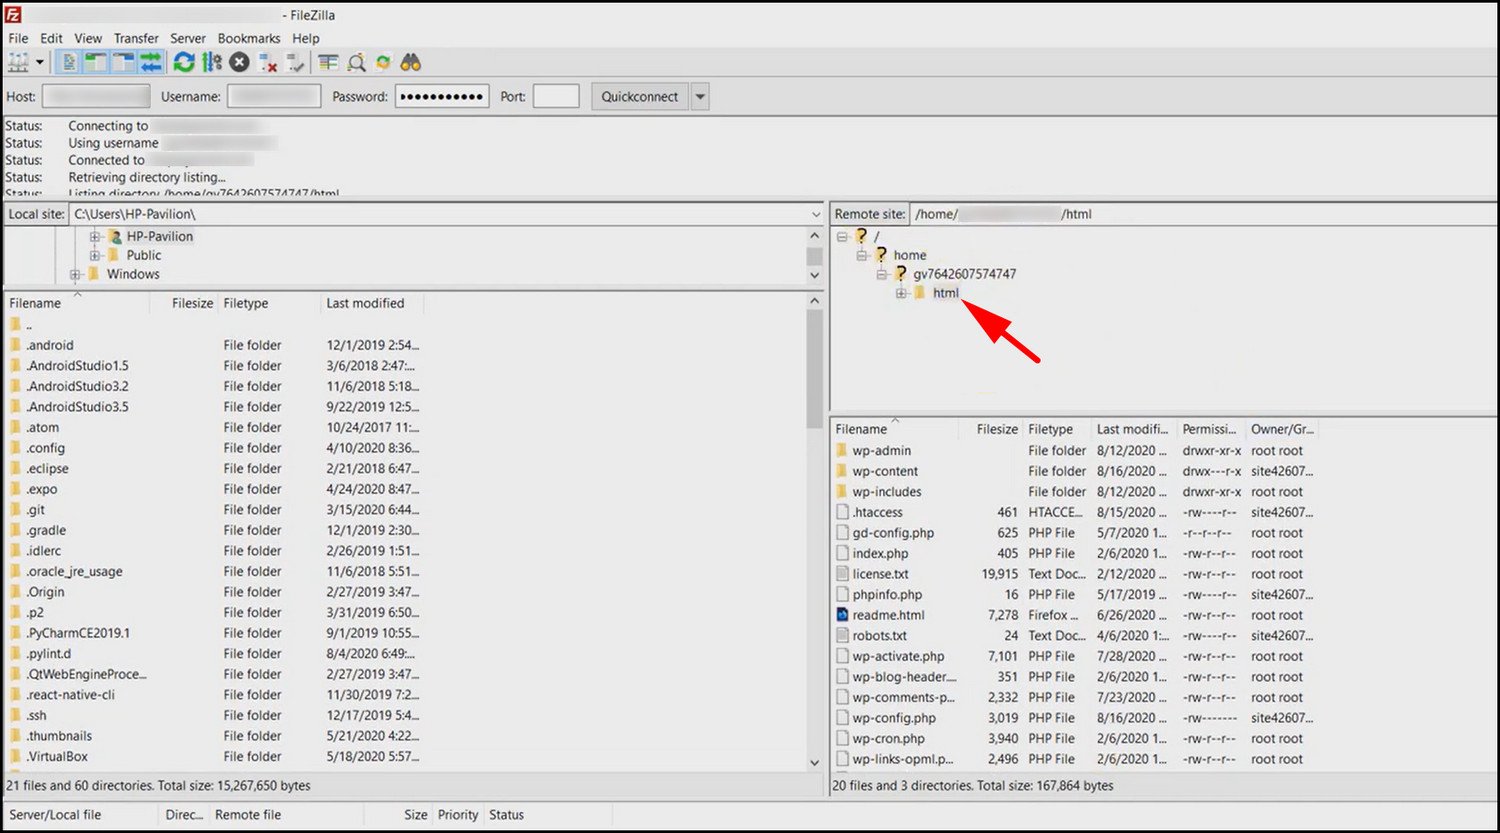
Open the FileZilla client from your desktop. This normally connects the hosting account to your computer. From here, you can access the folders containing the WordPress site.
If you have already logged in to your hosting account, you will see the site’s files in the left section. There will be a folder containing the site’s name. Inside this folder, there will be a bunch of files that we do not need now. Find a folder named public_html or html. Expanding this will reveal the WordPress files. Right-click on this folder and click on Download.
Make a copy of this folder and name it as hacked_site_files. You can also save it as a zip file. This will serve as a backup in case we accidentally delete something important from the infected site folder.
2. Take The Site Into Maintenance Mode
It takes some time to remove malware from your WordPress website. Until you get back the old secure copy of your site, you certainly don’t want any of your visitors to click on the malicious links.
So, put your website into maintenance mode to let visitors know some maintenance procedure is taking place at that time.
This can be done smoothly if you still have access to your WP dashboard. Simply, install a maintenance plugin like LightStart. Use this free plugin to enable the Maintenance Mode on your website.
Just click Settings → WP Maintenance Mode after installing and activating the plugin.
Then, in the general tab, set the status as Activated. Now save the changes and your site will go into the maintenance mode.
Now, if you can’t access your WordPress dashboard, then you need to put your site into maintenance mode manually. Do the following:
Open FileZilla and go to the public_html folder. Double-click on the .htaccess file. Add the following bits of code and save the file. Make sure to enter your IP Address so that you don’t get blocked too.
Remember, we still need to access the site from your computer.
order allow,deny
deny from all
allow from [your_IP_address]
Try accessing your site from your phone now. You should see the 403 Forbidden Error. That indicates we have successfully restricted our site.
3. Change Site Passwords
Now, it’s time to take back some control and reset all the passwords.
At this stage, the intruders have already changed the WordPress Dashboard password. They may also affect the MySQL credentials. So, change these and enter a new strong password now.
First, check if you can log into your hosting dashboard. If that’s affected too, request a password reset and try contacting the host’s support team. They will help you get back to your account.
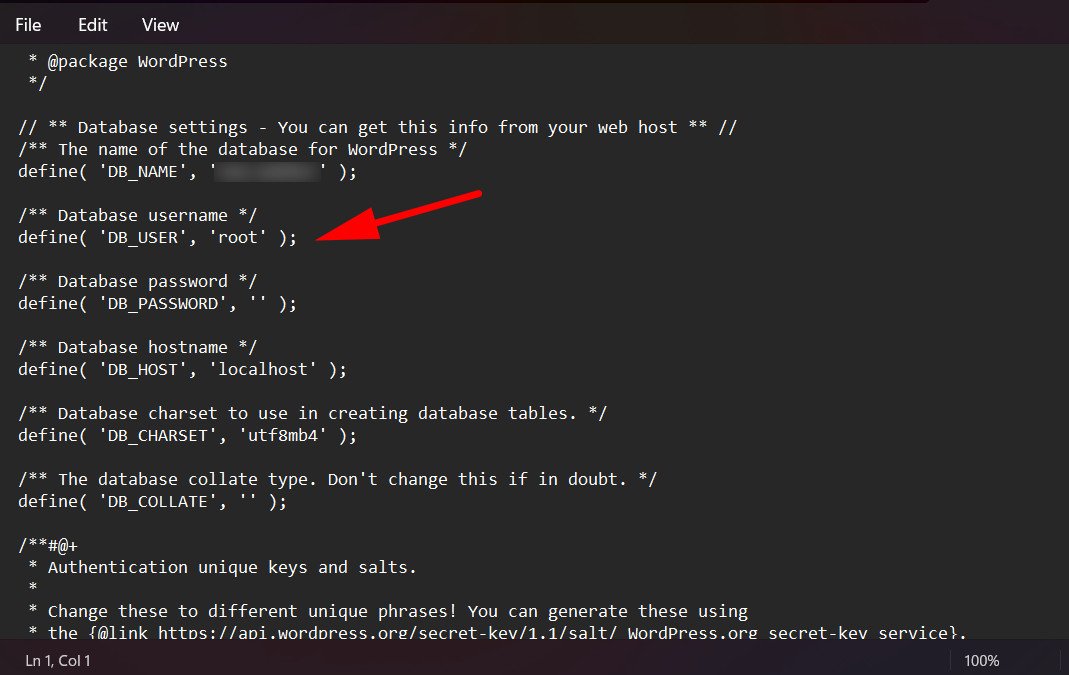
To reset the database password, we need to know its name first. Open FileZilla, navigate to the site’s root folder, and open wp-config.php file. Scroll down and find DB_NAME in this file. The name next to it is the database that WordPress uses. Also, note the username.
For our case, the database name is root.
Next, log in to the hosting account, search for phpMyAdmin, and open it. You will see a list of databases listed on the left.
Find the database that we noted earlier in the WordPress config file from the left panel and click on it.
Now click the Privileges button. This will reveal all users who have access to this database. Locate the admin user and delete any additional users you find unknown here. These are the intruder accounts used by hackers to take over your site.
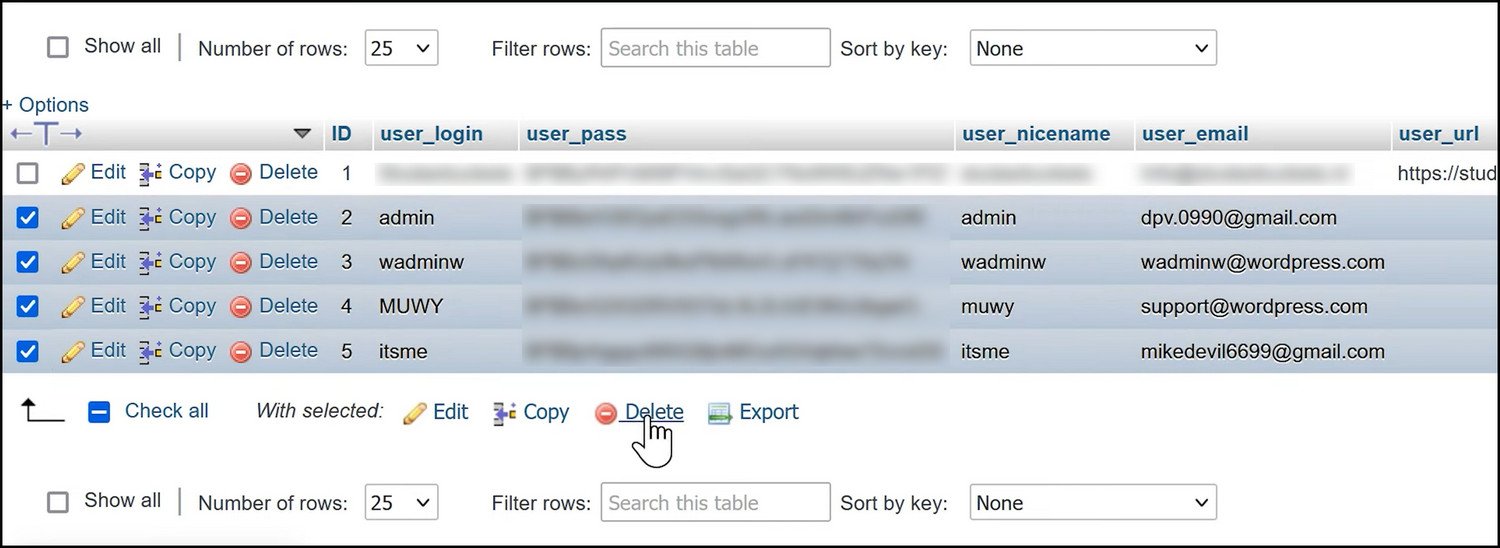
To change the admin password, click on Edit next to the admin username. Here, enter a new username and password. Use a password generator and set a difficult-to-guess password. Click the Go button at the bottom to confirm these changes.

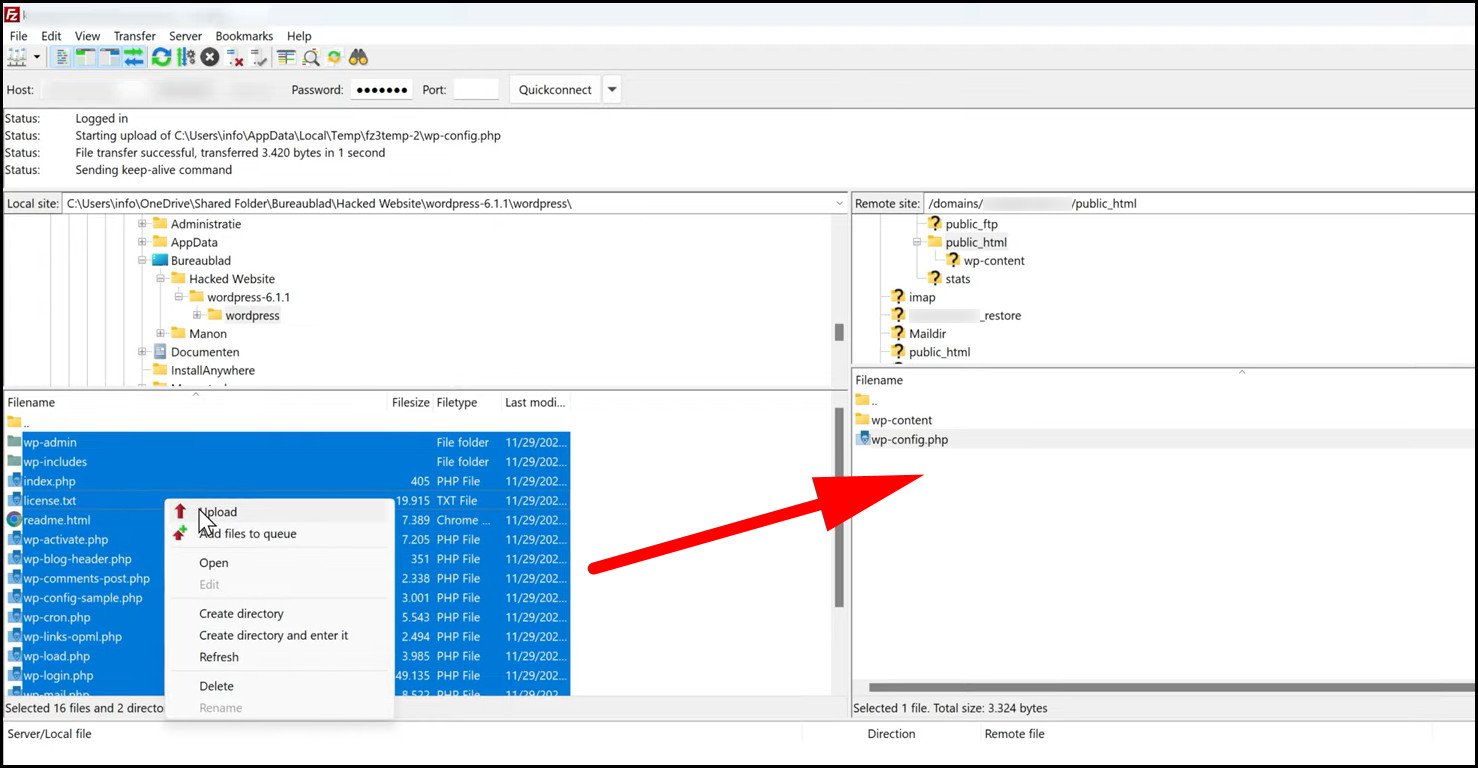
Now, we need to enter the new username and password into the WordPress configuration file. Go back to FileZilla and open wp-config.php. Find DB_USER and DB_PASSWORD and copy the new username and passwords over to this file. Don’t forget to save it and upload the newer file version to the hosting server.
It is also a good idea to update the FTP client passwords too. Go to the hosting dashboard and find SFTP. Here, change the credentials and save it.
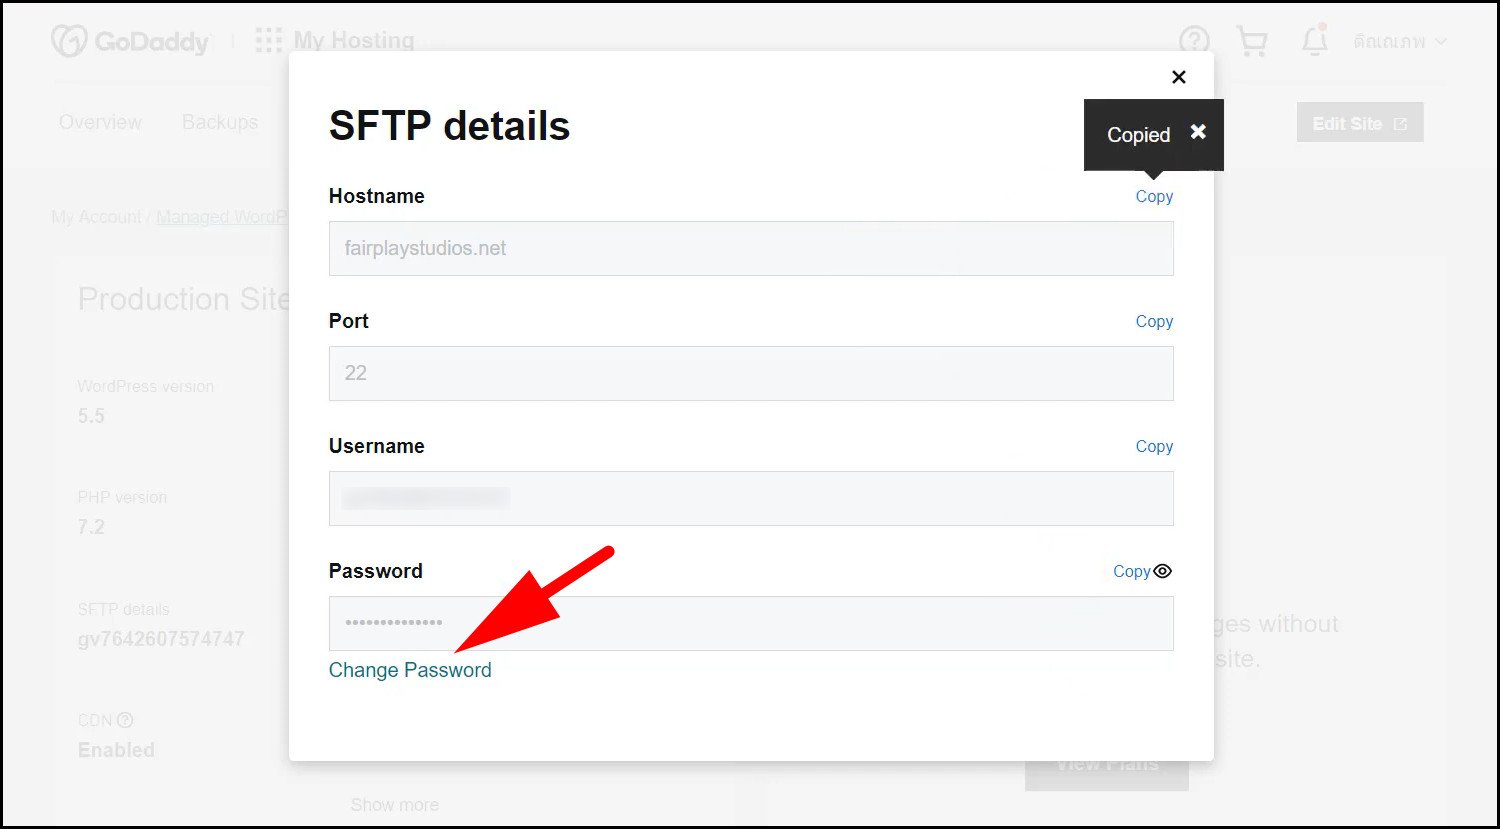
Open FileZilla and enter the new credentials right at the top. Then press Quick Connect.
However, the WordPress login page may still not show up because the core files are corrupted and infected with malware. We’re gonna take a look at those and try to remove malware in the next steps.
4. Inspect the wp-config.php File for Infection & Remove Malware if Found
We have already used the WordPress configuration file earlier to change the database password. You may not realize it, but the hacker can insert malicious codes here.
That will compromise the security of the WordPress site. So, we need to remove malware from there too.
Download the latest version of WordPress and extract it to a new folder. Open the wp-config.php file. Now, compare this file with your site’s config file in FileZilla.
Delete any lines of codes that appear to be foreign. This file should only contain the database username, passwords, hostname, etc. If you see anything suspicious, consider it as malicious.
Remove those, save the file, and upload it when your FTP client asks for the file change.
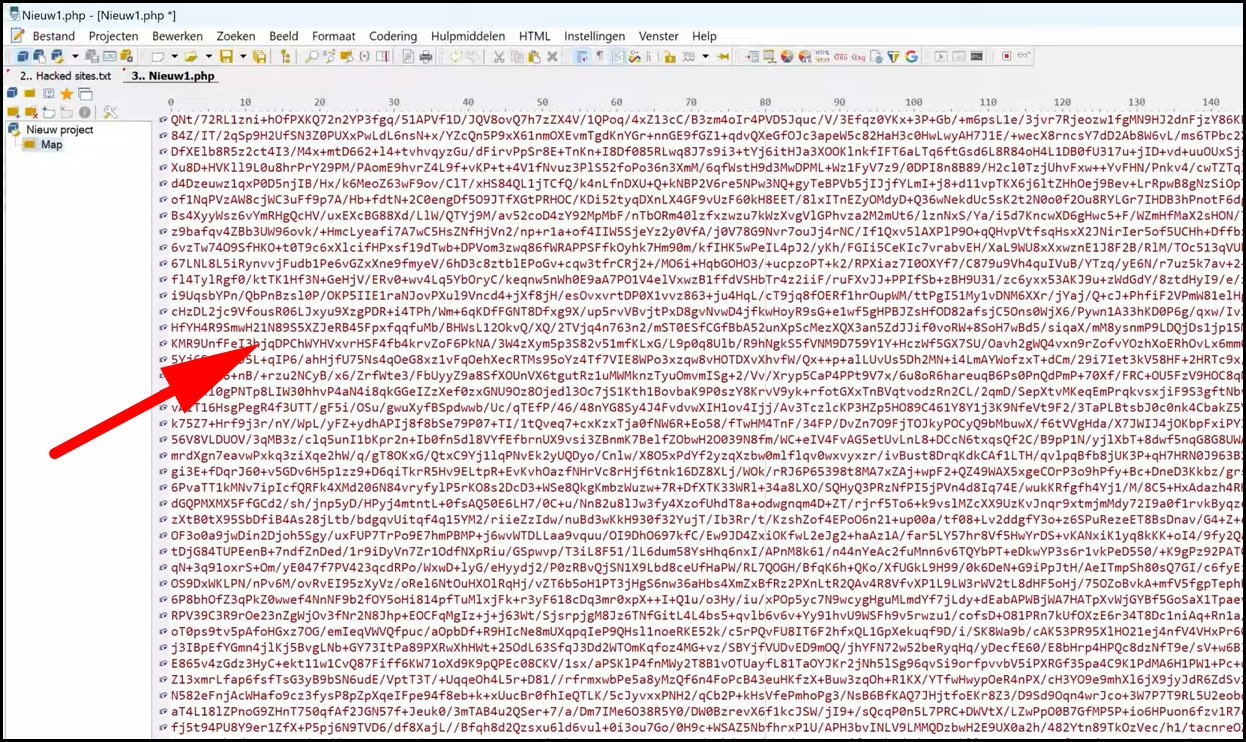
This is a good time to check the other files that got infected. This will be reflected in the modification date. Open FileZilla and look at the last modified date for each and every file. Those containing malicious codes will be modified at the date when the site is compromised.
Take special notice of these files, and you will find codes that have nothing to do with you. Note down the file name, and it will help you locate exactly why the site got hacked. You can save some time by running a virus scan on the hacked site files we downloaded earlier. This will also tell you the exact files containing malware.
5. Install Fresh WordPress Files
Now, remove all the existing WordPress files from your hosting server. These contain malware and viruses, which are causing all the havoc. Replace those with the latest untouched WordPress files we downloaded earlier.
Open FileZilla and go to the public_html folder. Leave the WP Contents and the wp-config.php files in their current state. Select everything else and delete them.
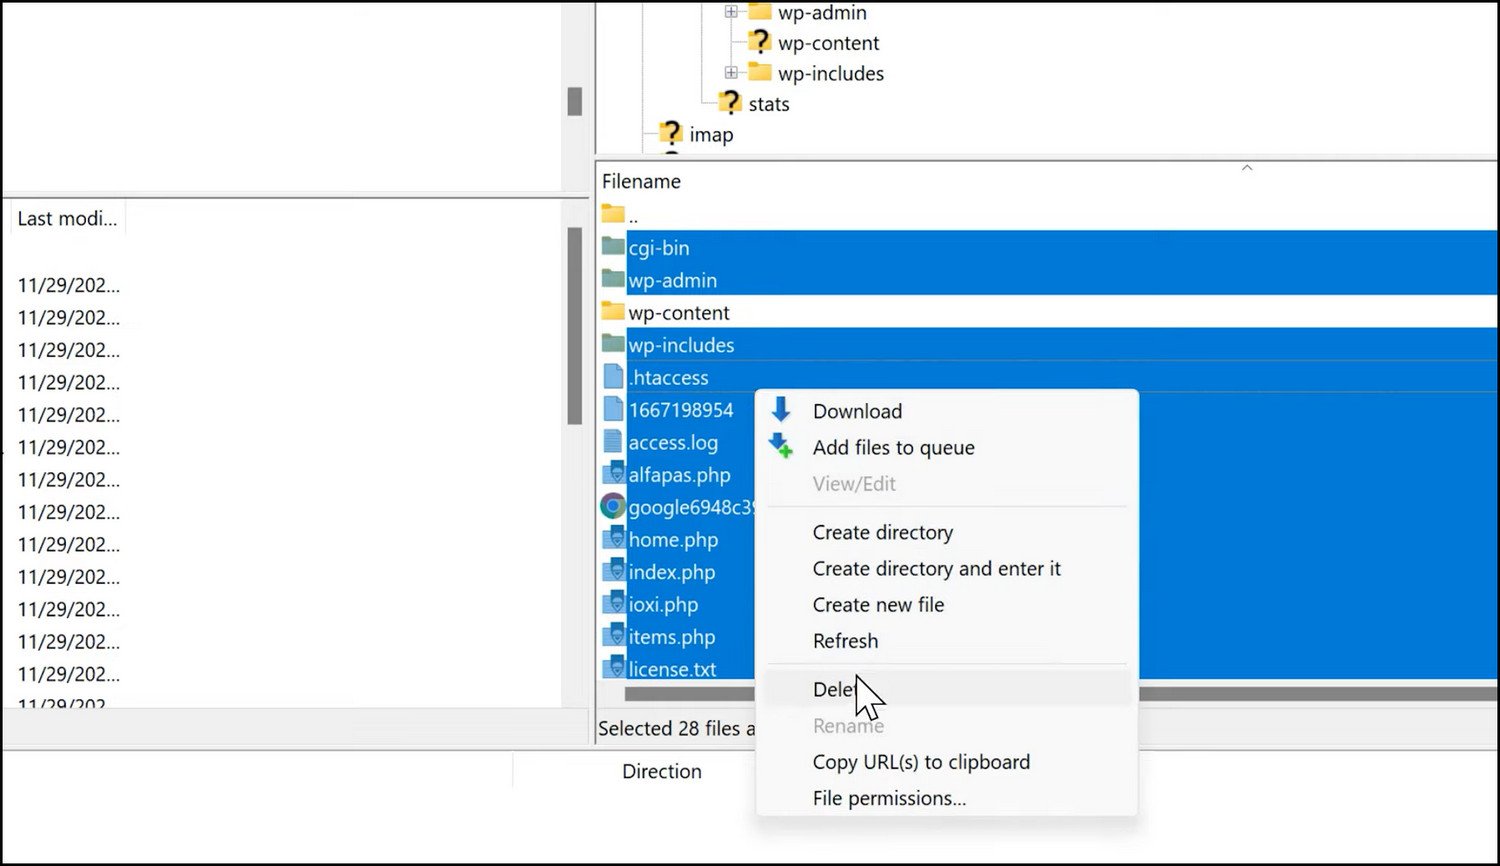
Copy the fresh WordPress files from your computer (except WP Contents) and paste them into the public_html folder in FileZilla. Wait for the files to upload. Now, go visit the site from your browser. The site should load up with its contents.
Also, try to log in to the WordPress dashboard. This should load perfectly, and you will be able to sign in successfully. Things are looking much better now, considering the login page would simply refuse to load up before.
But we are not done yet. There is some malware hiding in plain sight. Now it’s time we remove malware from those sources.
6. Re-install Themes and Plugins
On a hacked WordPress site, themes and plugins are ideal places for inserting malicious codes. You may also find stuff that you never even installed. We will attempt to remove those here.
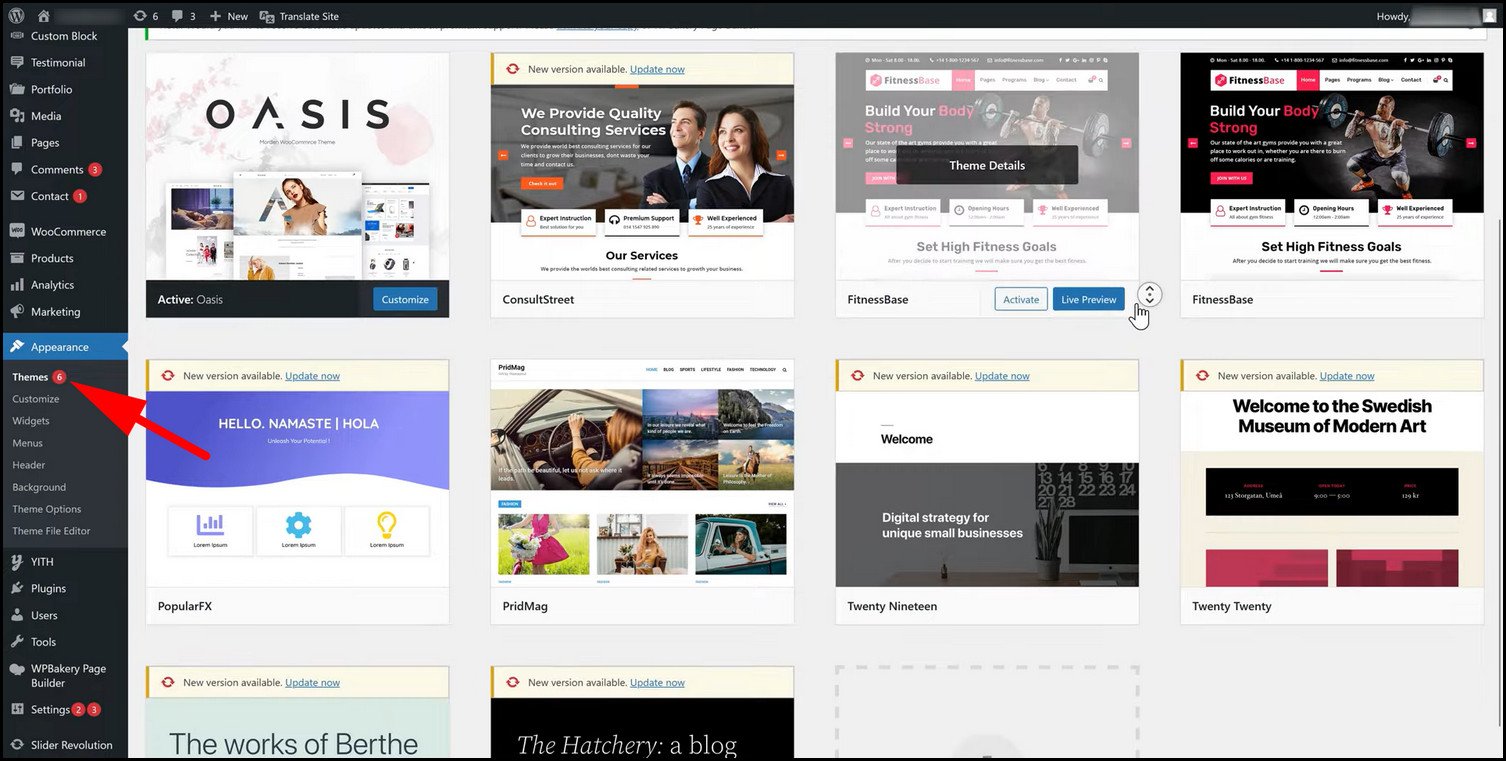
Open the WordPress dashboard and go to Plugins > Installed. Note everything that you installed. Also, go to Appearance > Themes and see which theme is currently in use. Take a screenshot if needed.
Now open FileZilla and navigate to the WP Contents folder. Delete everything in the Themes and Plugins folder.
Then, go back to the WordPress dashboard to install the plugins, and activate the themes you had earlier. Activate each individually from their menu if they use premium licensing.
7. Check Individual Posts and Pages
Remember, we kept the WP Contents folder intact? That means all the pages and posts from our old website are there. They may contain malicious codes and links. Go through all the existing posts and remove anything that you didn’t add.
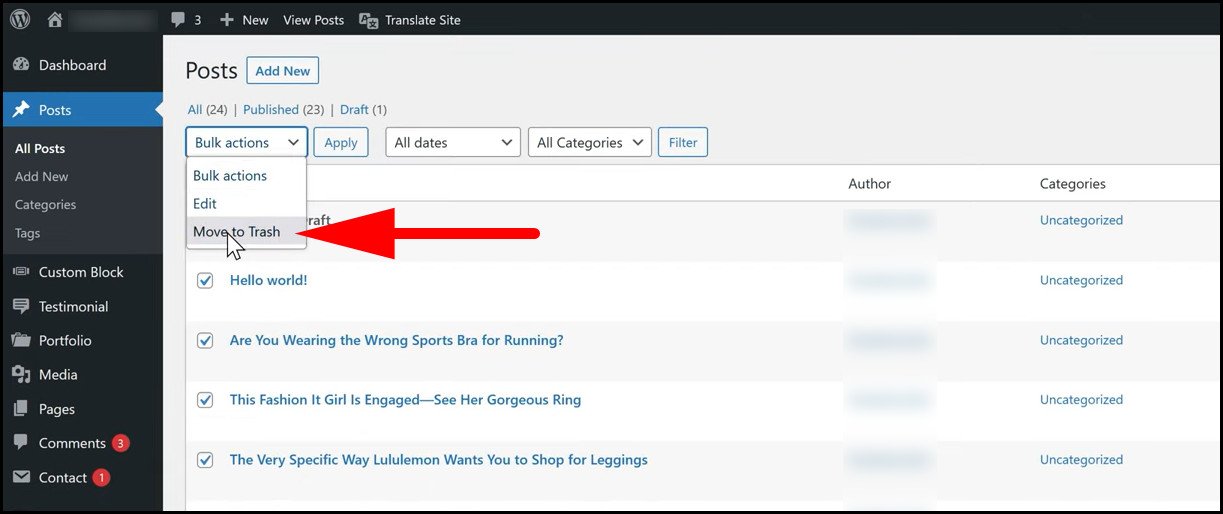
Open the WordPress Dashboard, and click on Posts > All. Look out for the ones added recently.
Press the Date option and sort the posts by recently added. You will likely see promotional posts and fake product reviews. Select these specifically, choose Move to Trash under Bulk Actions, and press Apply.
Repeat the same with Pages. Check for the presence of any foreign content and delete them instantly. For the contact page, check the code for any modification. If you look at the last changed date, that will tell you this. Remove the sections that were added later on.
For the best results, delete the pages if you do not understand the complex codes. Then, build the contact form from scratch. That way, there will be no rogue codes to worry about.
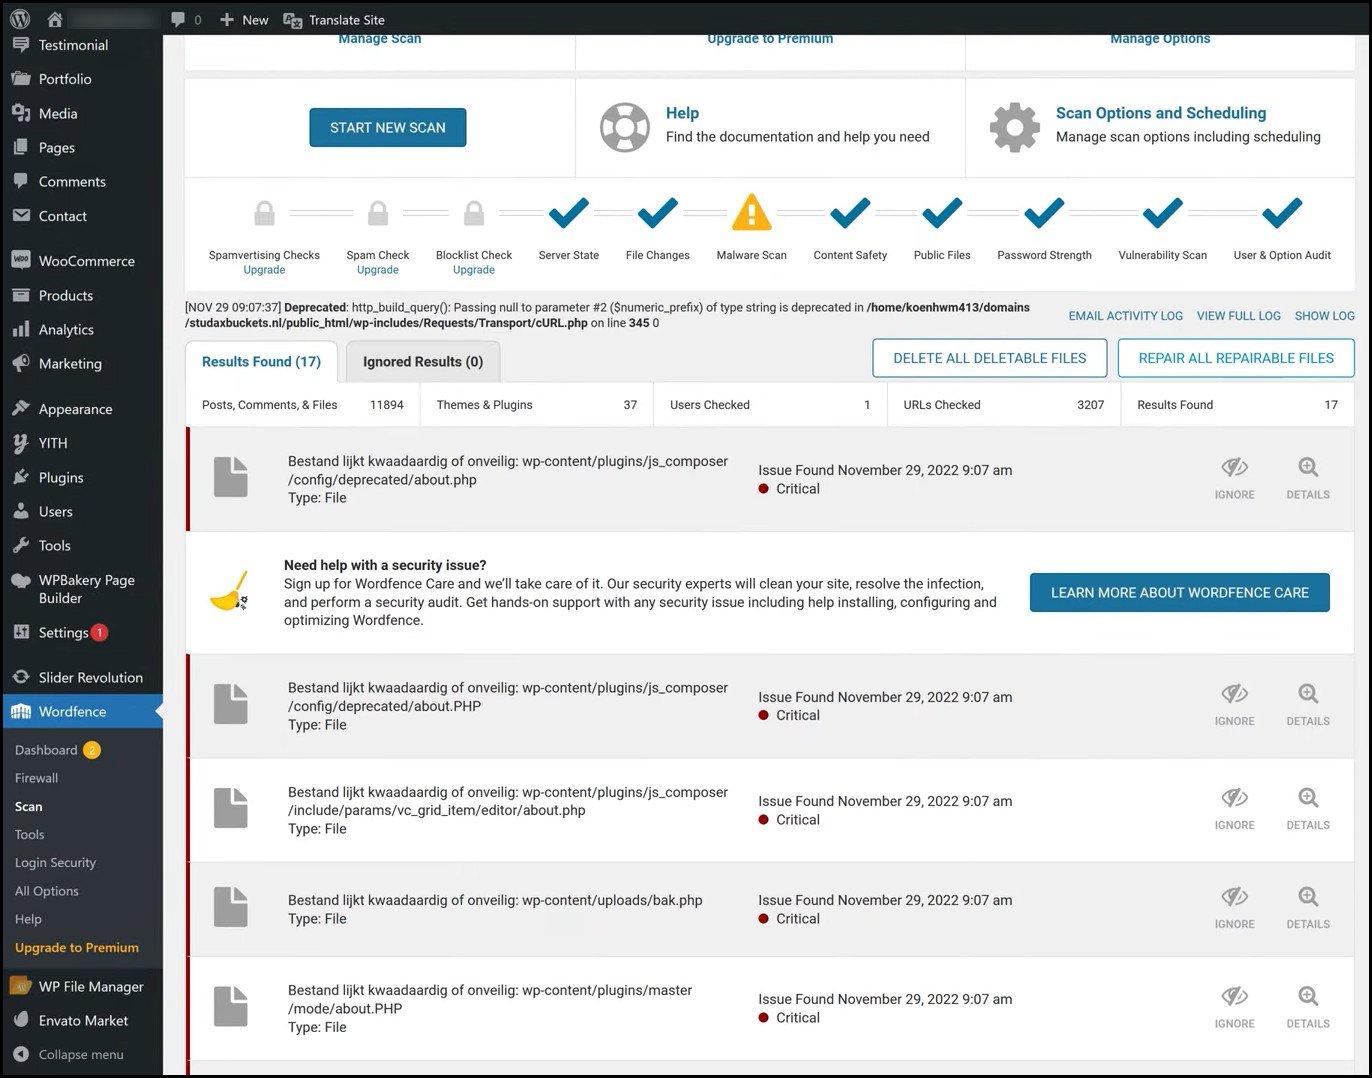
8. Run a Malware Scan
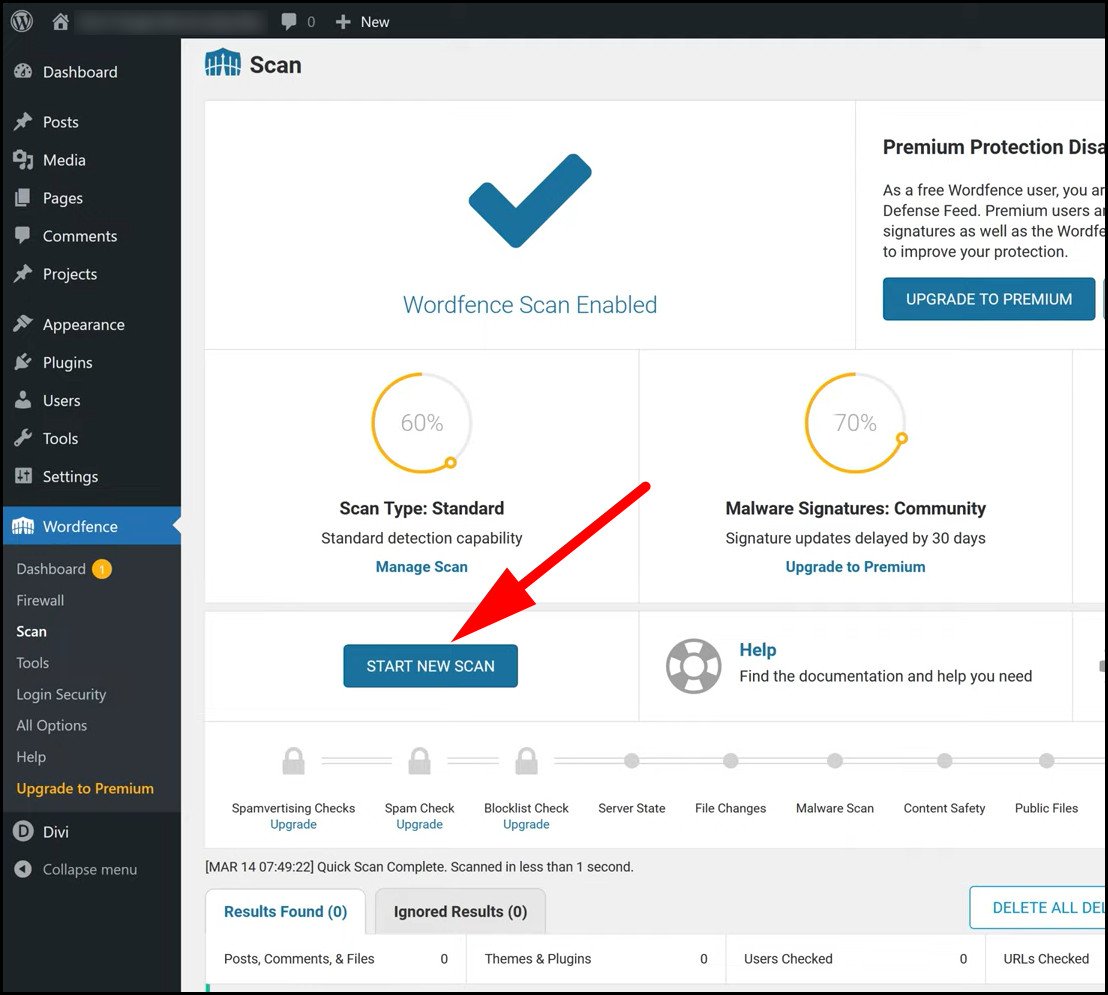
Now is a good time to install a WordPress security plugin and see if any further vulnerabilities exist.
WordFence is a top-rated plugin that was awarded the best security plugin for WordPress in our rundown for the best security plugin for WordPress. So, go ahead and download it.
If you already installed a paid security plugin, that will also work perfectly. Just activate your license to get access to the complete features.
So, run a complete scan of your site. Once it finishes, you can see the threats that are currently present. See for any specific codes that are causing the problems. Then, simply navigate to that file from the hosting dashboard’s file explorer and remove the block of code.
But if you are unsure, it is always a good idea to compare the infected file with a clean, backed-up one.
9. Check For Backdoors in PHP and SQL Files
At this point, you have cleaned most of the visible infections in your site. Though you remove malware from website that’s visible till now, the threat is not gone yet. Hackers may place pieces of code deep in the WordPress directories.
These normally do not do anything but act as a backdoor for the hacker to regain entry to the site in the future.
Even though we cleaned the old WordPress files, some infected files remain. The themes and plugins folder, WP Upload, along with wp-config.php is commonly affected by malicious software.
Intruders will place malicious codes in PHP files there.
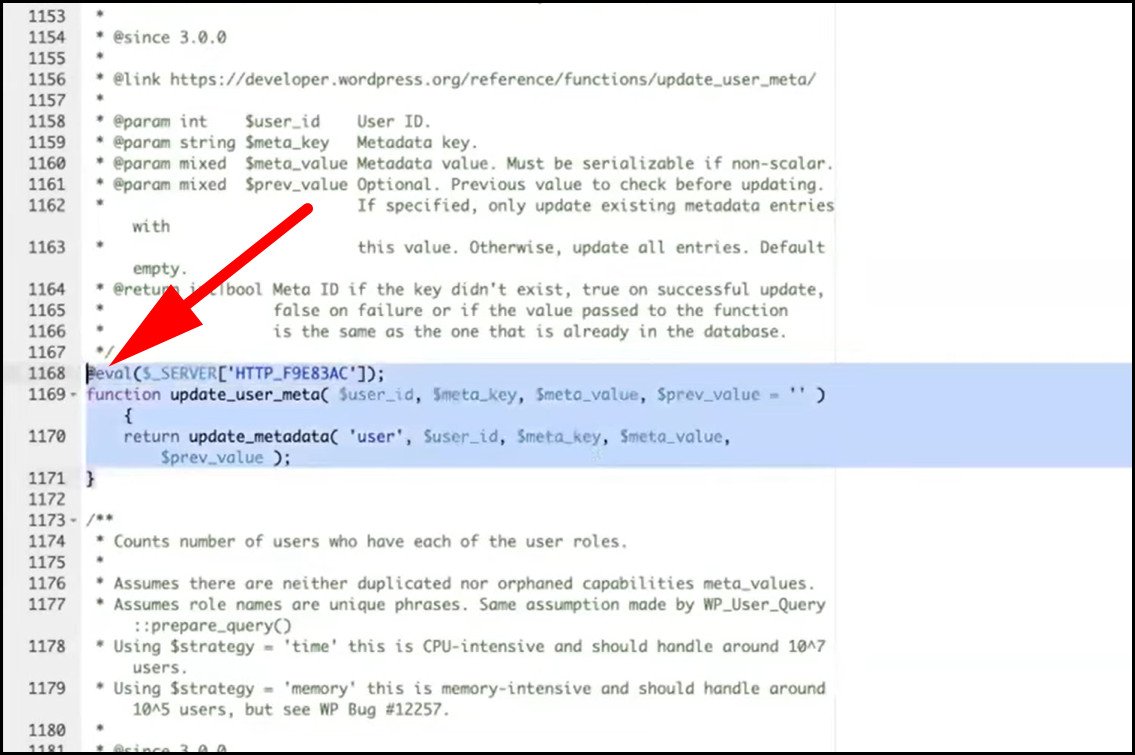
So, first, remove everything from the WordPress Upload folder. Then open the core WordPress files such as wp-config.php and look out for these functions: exec, system, assert, base64, str_rot13, gzuncompress, eval, stripslashes, preg_replace (with /e/), Move_uploaded_file.
Not every function will be malicious, so keep an eye out for extra blocks of code or those that do not have any comments. Remove them and see if the site continues to function properly.
Sometimes, the site can simply break, so make sure you have the file backed up before.
Pro Tip: When cleaning Javascript files, always remove the entire code after the start of the malicious code. This is because hackers always place the bad scripts after the end of the code. This is different from the malware present on PHP files, where the scripts can be placed anywhere.
A good way is to compare the infected and old backup files for any changes in the code. Keep them open side by side, which will help you identify which sections were added later. Then, simply select the code and press Delete. Do not forget to save the file when you are done.
Finally, run a security scan once more. This is to ensure that no remaining issues need your attention.
Pay close attention to the overall security score. This should be better than when we first installed the security plugin. That indicates we have successfully remove malware from our site.
10. Remove The Site Blocklist on Google
Our site is no longer infected with viruses. But when you search for the site on Google, you will get the same old spammy results. That is because the last time Google indexed the website, it was full of malware. And it will continue to show that until you request for a new sitewide review.
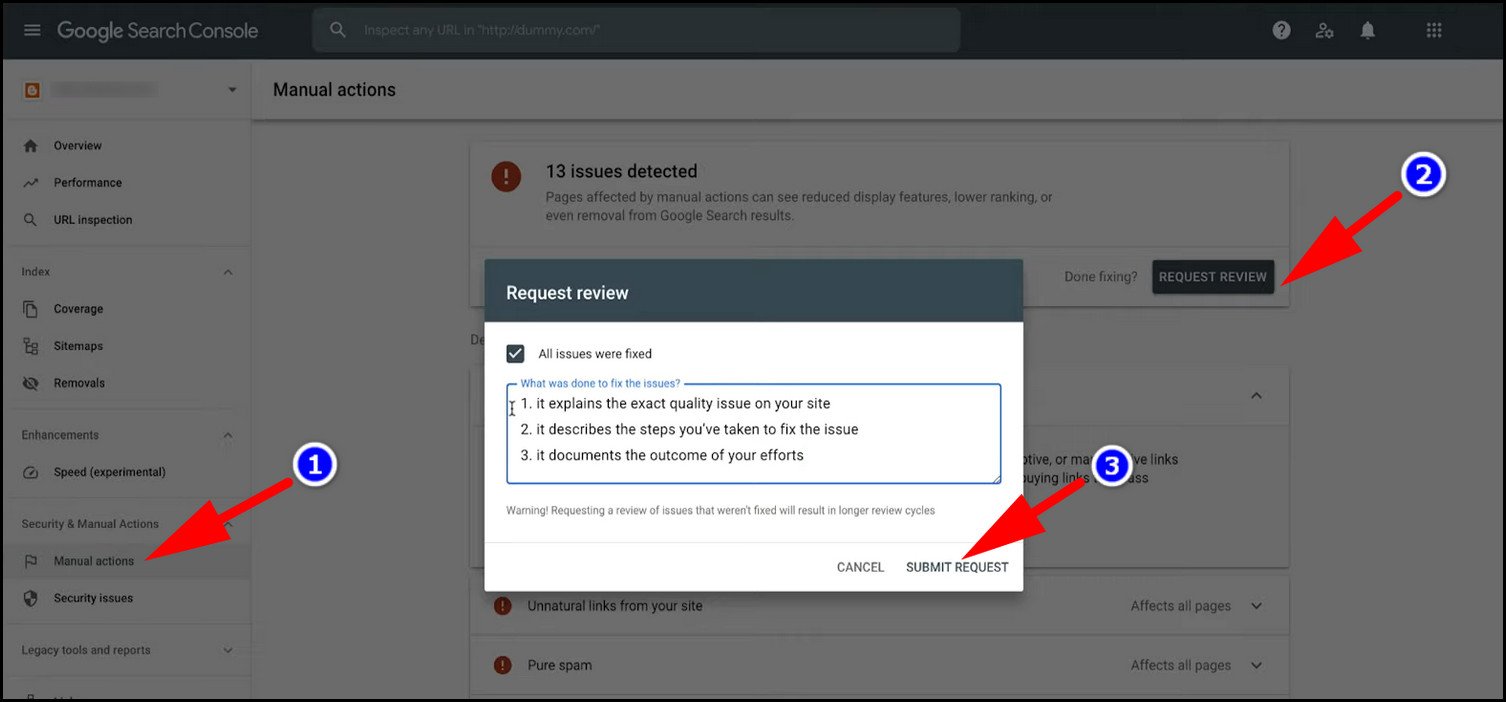
To do this, log in to Google Search Console and click on Security Actions > Manual Actions. Here, you can see all the malware detected previously. We have removed all malicious items and resolved the issues, so click on Request a Review. Mark the checkbox next to All issues were fixed and press the Submit Request button.
You may need to wait for a few days before Google indexes the site. The search results will be back to normal, and Google will not display any warnings when viewers access the site from any browser.
Protect Your WordPress Site From Future Malware Attacks
Now your site is secure and back online. But the security breach caused a lot of hassle for you and the users, right? To prevent that from happening again, you have to strengthen the site’s security.
Things like weak passwords, the absence of a 2FA system, outdated WordPress software, etc., are behind most cyberattacks.
Let’s see some prevention measures you can take to make your WordPress site secure:
Use Strong Passwords
Even as nooob as it seems, a weak password is the main reason why the site got hacked in the first place. Hackers guess the combinations of commonly used passwords and use them to log in to your site.
So, use a strong password to secure the WordPress Dashboard and the database. Use a password generator and set up a difficult password. Also, build a habit of changing passwords after every few months. That will only make things difficult for the intruders.
Add 2FA to WordPress
A Two-Factor Authentication system secures your WordPress site by adding a second layer of protection. To log in to WordPress, you will need both the password and a code that is sent to your phone. Unless the hacker really gets hold of the 2FA code, it is almost impossible to log in.

Almost every reputable security plugin gives you the option to enable the 2FA system on WordPress. If you haven’t done it already, this is the first thing to do on your WordPress site. You can check our dedicated guide, where we show you two different ways to set up a Two Factor Authentication for WordPress Admin.
Limit Login Attempts
Hackers use DDoS attacks to guess the password. They will continue to do this using bots until they can get in.
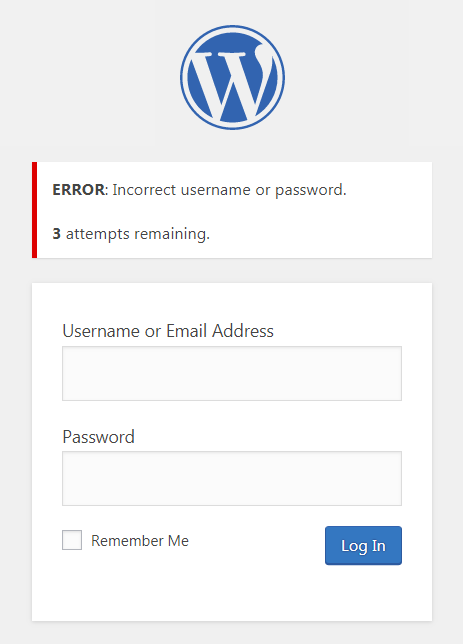
You can stop this by limiting the maximum number of times someone can attempt to log in. Let’s say you set 4 times when you can try entering the passwords. After that, WordPress will show you a warning and stop you from logging in.
WordPress has countless plugins to help you limit login attempts. Just install them, configure the login options, and you are done. No more DDoS attacks from now on.
Keep Everything Updated
Always keep the core WordPress software, themes, and plugins updated. This is very critical to a site’s overall security. Updates contain patches to software loopholes that hackers can use to gain entry to your site. If you continue to ignore the pending updates, you are only giving them more time to utilize this option.
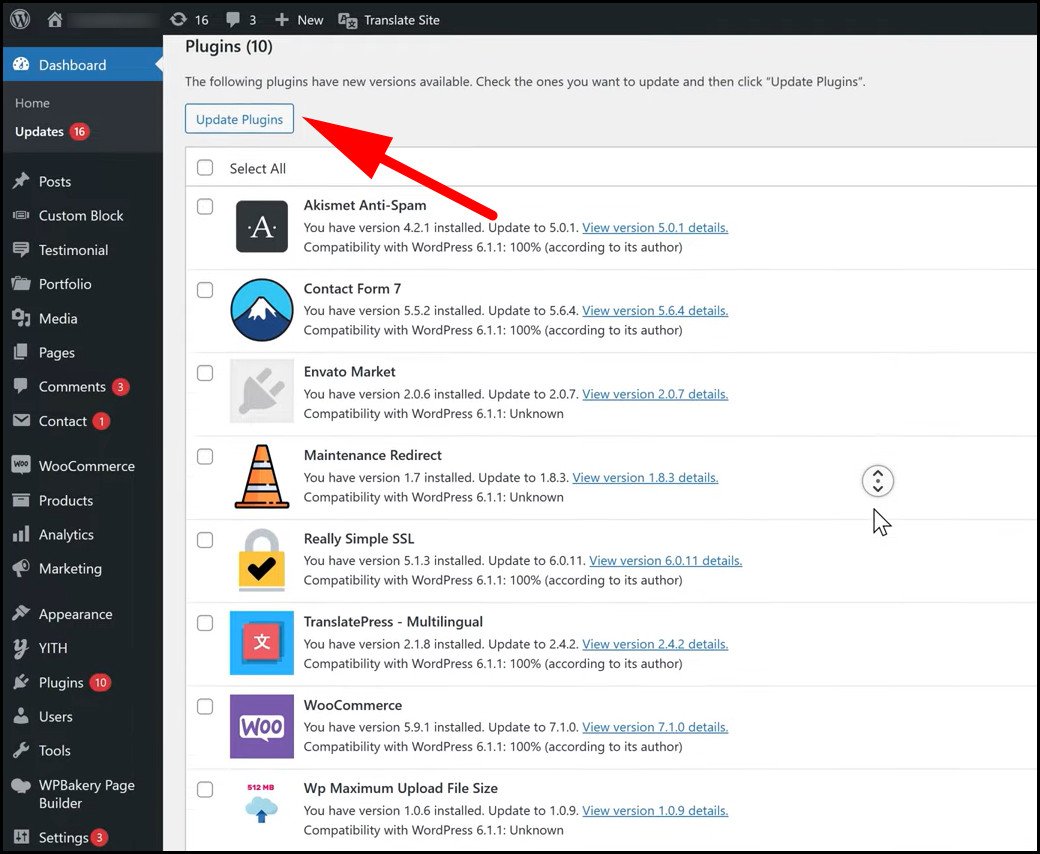
So, always check the Update icon for alerts and install them as soon as you see them. You can also set WordPress to install the updates automatically. The same goes for the themes and all plugins.
Frequently Scan Websites For Malware
You should always use a security plugin to scan the site periodically. That way, you will know when a vulnerability has popped up.
They contain the latest updates on any known loophole and can patch your site instantly based on that information. Plus, the plugin recommends actions to increase the site’s security.
Frequently Asked Questions (FAQs)
Final Words
A WordPress site can easily get infected with malware. Instead of panicking, take in a few breaths and calm yourself. You will need all the patience to remove malware and any infected files from your site.
It will take some time, but you must check every file for possible infection. You do not want to leave out any hidden backdoors that hackers will use to attack your site again. And make sure you set strong passwords and enable two-factor authentication so that this does not happen again.
We hope you found this guide helpful and recovered your site successfully. Comment below if you have any questions, and we will get back to you soon.