
Nowadays, relying only on a password for your WordPress login isn’t enough. Imagine if someone grabs your login info and gets into your WP admin panel. Once got the access, hackers can swipe your site’s data and bring it offline.
Two-factor authentication can be your savior in that case to increase WordPress security.
Enabling 2FA brings an extra security layer where you can’t log in to the WordPress Dashboard with only a password. A security code will be needed to enter the admin panel. Just like Facebook and Google send codes to your phone while trying to log in from different places/devices.

But how to add a Two-step Authentication to your WordPress site? Read ahead to learn just that!
Why You Should Use Two-Factor Authentication in WordPress?
Two-factor authentication requires two layers of security checks. Besides your password, you need to enter a code to log in to your WordPress Dashboard. Usually, you get the code from SMS, calls, or a time-based login key. Being 100% effective, 2FA can block brute-force attacks on your WordPress site.
Intruders can run programs that guess the right username and password combinations. Here, only two-step authentication can save your admin panel, making sure only the person with the correct verification codes can sign in.
Therefore, even if someone runs a brute force attack, they will get stuck at the 2FA prompt screen. The code will arrive on your phone, and that’s how you would know someone tried to get into your WordPress site.

What is an Authenticator App?
An authenticator app generates one-time codes that one can use with a two-factor authentication system. It uses encryption and a shared secret key to generate this code. As this code remains on your phone, the login process is secured.
The code usually remains valid for a few seconds. Once you enter it, you can log in successfully to websites using two-step verification. Many apps provide this authentication feature. Google Authenticator and Authy are among the trusted ones.
How to Add Two-Factor Authentication in WordPress Free? [2 Easy Ways]
There are two methods of adding two-factor Authentication on your WordPress site. You can either install a dedicated plugin or utilize the 2FA capability built-in on any security plugins available for WordPress. For both cases, an authenticator app is required for verification.
However, the second option is great for those who already have a security plugin installed. That will reduce strain on your site by removing the need to install another plugin. But don’t worry, we will look at both methods in this section.
Starting with installing the dedicated 2FA plugin on WordPress, let’s see how to enable two-factor authentication in your WordPress login:
1. Using the WP 2FA Plugin for WordPress
For the 2-FA plugin, We will use the WP 2FA as the WordPress Authentication to set up a Two-Factor Authentication for WordPress. At New Webber, we also use the same plugin to handle our two-step verification duties on our sites. It works great and has performed admirably for us.
First, you need to install WP 2FA on your WordPress plugin dashboard. To do this, log in to the WordPress Dashboard and search WP 2FA from the Plugin directory. Click the Install Now button, and it will be installed after a while. Read our guide to installing a plugin in WordPress to learn in-depth about WP plugin installation.

Now, to set up the 2-factor authentication, navigate to Users > Profiles from the Dashboard. After that, click on Configure 2FA.

Next, choose the One-time code via the WP 2FA app. There is also an option to send the code to an email account, but we did not go by that route.

Now, it’s time to connect the authenticator app to the plugin. We used Google Authenticator for this tutorial. So, install it from the Play Store if you haven’t done it already.
You also can add the Google Authenticator extension if you’re using the Chrome browser. Enable the verification code from there.
From your mobile device, Open Google Authenticator and tap on the plus icon in Google Authenticator. Then tap on Scan a QR Code and scan the code shown on the WP 2FA Setup page.

After that, click on the I’m Ready button on the WP 2FA page.
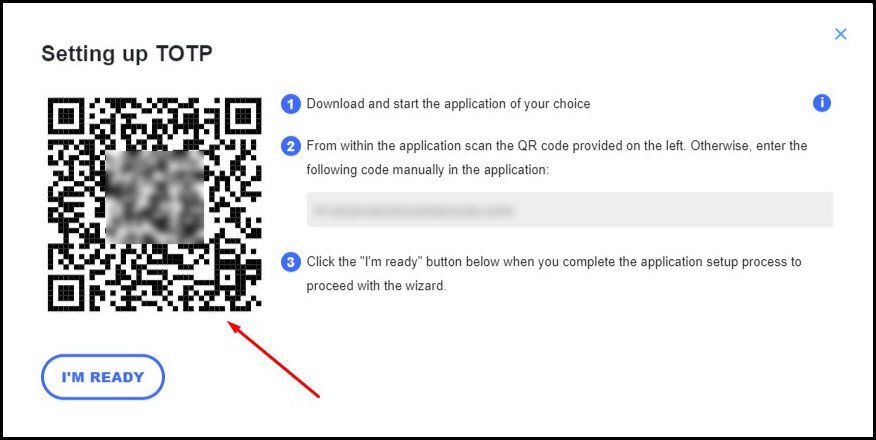
Now enter the verification code from Google Authenticator into the WP 2FA Setup Wizard. Then click on Validate and Save.

The 2fa setup process is almost complete. This plugin also allows you to generate some backup codes in case your phone is not next to you. To do this, click on Generate Backup Codes.

Download these or simply take a screenshot of it. Once done, click on Close the Wizard. The 2FA setup process is complete now.

Now, all you need to do is test the 2fa whether it’s working or not. To do that, sign out of the WordPress Admin Panel. Then try to log in to wp-admin by entering the username and password. If you enable the verification process properly, a prompt should appear asking for an Authentication Code.
Enter the code from the authenticator app and see if you can access your WP Dashboard!

Only after providing the code from Google Authenticator can we enter the WordPress dashboard. That means we have successfully secured our WordPress site and made it more secure.
2. Using a WordPress Security Plugin
Most security plugins have a Two Factor Authentication feature built-in. Even the premium ones give you the ability to set up this extra security measure in their free tier. So, if you are someone already using a security plugin like Wordfence or Sucuri, it’s unnecessary to use a separate plugin just for two-step verification.
To demonstrate this, we will use Wordfence. This is the most popular security plugin right now, with over a million active installations. It even made it into our shortlist for the best WordPress security plugins. Do check out the comprehensive list in our separate article.
We assume that you already have Wordfence installed. If not, go into the WordPress Plugins directory and install it.

Click on Login Security under the Wordfence panel in the WordPress dashboard to start configuring it.

Alternatively, you can also open this option by going to Users > Profile and clicking on the Activate 2FA present under Wordfence’s Login Security menu.

Using any authenticator app (Wordfence recommends Google Authenticator or Authy), scan the QR code present in the Wordfence 2FA setup screen. This will give you a code that you need to enter on Wordfence. So, enter that and click on Activate.

Like WP 2FA, Wordfence provides backup codes in case you have lost your phone. You can generate these and keep them in a safe place for future use.

And that’s it. Wordfence has successfully set up a Two Factor Authenticator on your WordPress site. The next time you log in to the WordPress Admin Panel, you’ll see the verification screen. Then, the authenticator app will provide you with the verification codes, and you can log in securely.
Is a 2-step verification Enough to Protect Your WordPress Website Against Attacks?
While a two-step Authentication works great against brute force attacks, other vulnerabilities may exist on your sites. These require additional measures. So, just using such an extra layer of security on your WordPress site is not enough.
So, what can you do to secure your WordPress site?
The first thing to look out for is that all the software is updated and running on their latest versions. These include the core WordPress installation, plugins, and themes. Next, you need to ensure you are using strong usernames and passwords. Ensure you set up something strong and difficult to guess.
Also, change the default admin page URL for WordPress. This makes it difficult for intruders to find the WordPress login URL. Limiting the number of people accessing the WordPress login page is also a good idea. Some tools will only allow users from a specific IP Address to access the login page.
In our blog, you’ll find a comprehensive guide on how to increase the security of your WordPress site. Do check that out.
How to Remove Two-Factor Authentication on WordPress?
We never recommend removing Two-Step verification from your WordPress site. However, you may need to disable the 2fa in case you lost your phone or do not have the backup codes anymore. Switching to a new device or a different authenticator application will also require you to remove the existing 2FA verification in place.
So, here’s how you can remove Two-Factor Authentication from WordPress:
- Login to your WordPress Admin Panel.
- Click on Users in the left tab of the Dashboard.
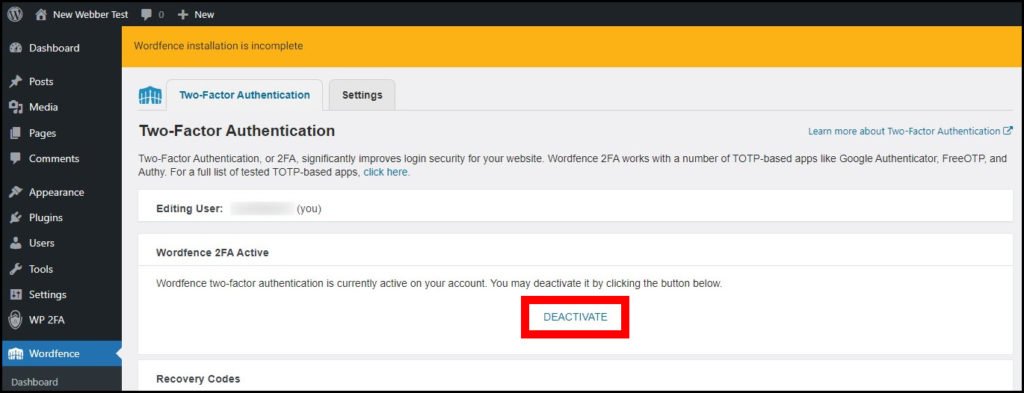
- Hover over the user account and click on 2FA. This will take you to the plugin’s 2FA settings where you configured this.
- Click on the Deactivate button. The app will ask for your permission to remove the Two-Factor Authentication
- Allow the deactivation and your 2FA will be removed
Now, the next time you try to log in with that account, no prompt will ask you to submit a 2-step verification code. That means you have successfully removed the existing 2FA authentication from your WordPress account.
Frequently Asked Questions
Your WordPress Site is Now More Secure
By now, your WordPress site will be rocking a Two-Factor Authentication protection. This will give you peace of mind, and you can relax knowing no one can log in to your site, even with passwords.
The next step would be to strengthen the security of your WordPress site. Check out our article on WordPress security, where we tell you everything about making WordPress more secure.
I hope you enjoyed going through this guide. Until the next WordPress guide, it’s time to say goodbye.